Download wxMSW-2.4.2-setup.zip
Unpack files
Run setup.exe for wxWindows
Follow the on screen install instructions
Run .NET
Select File->Open->Project
Find your wxWindows install path
Browse to the "src" folder
Open wxWindows.dsw
You may see a dialog that asks if you would like to convert the project format to the current .NET format. Select "Yes To All."
In .NET, select View->Solution Explorer.
In the Solution Explorer: right click on the project called "wxWindows." Select Build, then wait for the command to complete. This will take several minutes.
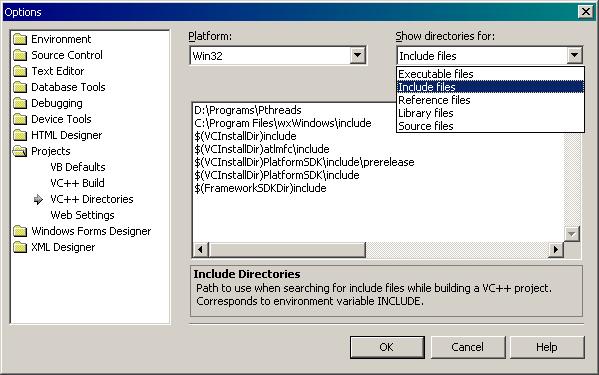
In the .NET menu bar: click Tools->Options. In the folder list on the left, browse to Projects->VC++ Directories. In the top right of the Options window is a list box labeled "Show directories for." Select Include files.
Add a new path by clicking the button with the folder icon. Type the path to the include directory of your wxWindows install path. I installed wxWindows under the file path "C:\Program Files\wxWindows." Therefore, the include path is "C:\Program Files\wxWindows\include."

Next, enter the path for the wxWindows library files in a similar manner. wxWindows library files are located in the lib directory of your wxWindows install path. You must first show directories for library files (using the list-box in the top right.)

Click "OK" for the Options window.
Lastly, copy the file called "setup.h" in the "wxWindows\include\wx\msw\" folder to "wxWindows\include\wx\"

You have now fully installed wxWindows. Any future C++ project you create will automatically look for include/library files in your wxWindows install path. So, to include wxWindows in a project, simply put "#include <wx/wx.h>" in the desired header file.
Create a new project in .NET to build wxAIM. Select "Visual C++ Projects" as the project type. Under Application Settings, select "Windows application" as the type, and make sure to check "Empty project" for additional options.


Unzip the wxAIM files to your project folder.
In the Solution Explorer: add all .h and .cpp files relating to wxAIM to the new project.
Note - optional files to add:

Browse to Linker->Input. In the "Additional Dependencies" field, copy and paste the following library names: wxmswd.lib tiffd.lib pngd.lib wsock32.lib comctl32.lib rpcrt4.lib

Browse to C/C++->Code Generation. In the Runtime Library field, select "Multi-threaded Debug DLL (/MDd)."

Click "OK" for the properties page.
Build the project.